
Learn how to track lead conversions without pulling your (or anyone else’s) hair out.
Dav Nash
8 min read

Before we get started, a prerequisite to this is having Google Analytics and Google Tag Manager set up.
If you haven’t done that yet (or just want to make sure you’ve done it right), head over to my guide on marketing analytics first.
All set up and ready to go? Sweet 👍. Let’s track some conversions.
If you’re just here to find a specific tracking solution, skip ahead if you want:
Otherwise, start from the top and I’ll teach you GTM as we go…
First, you need to decide what you want to track. Make a list.
Here are some questions to help with that process:
You should only track “actions”, like submitting a form, purchases, or downloading something. Tracking visits to specific pages (like the contact page) is pointless, as GA will do that for you anyway.
Really, the only time you would want to track a “destination” page view is when you have “thank you” pages set up for your forms. That’s not ideal, which I’ll explain shortly.
I’m going to ease you in gently so you can get used to how event tracking works on GTM.
Tracking email and phone link clicks doesn’t give you lots of info, and is really just a way of having limited oversight over contact methods which don’t give you any solid lead data.
There are ways to get lead data from email/phone clicks, but you’ll generally have to pay for a third party solution.

This is quick, easy, and just gives you the barebones info that someone has tried to get in touch with you. Also, it’s free 💰.
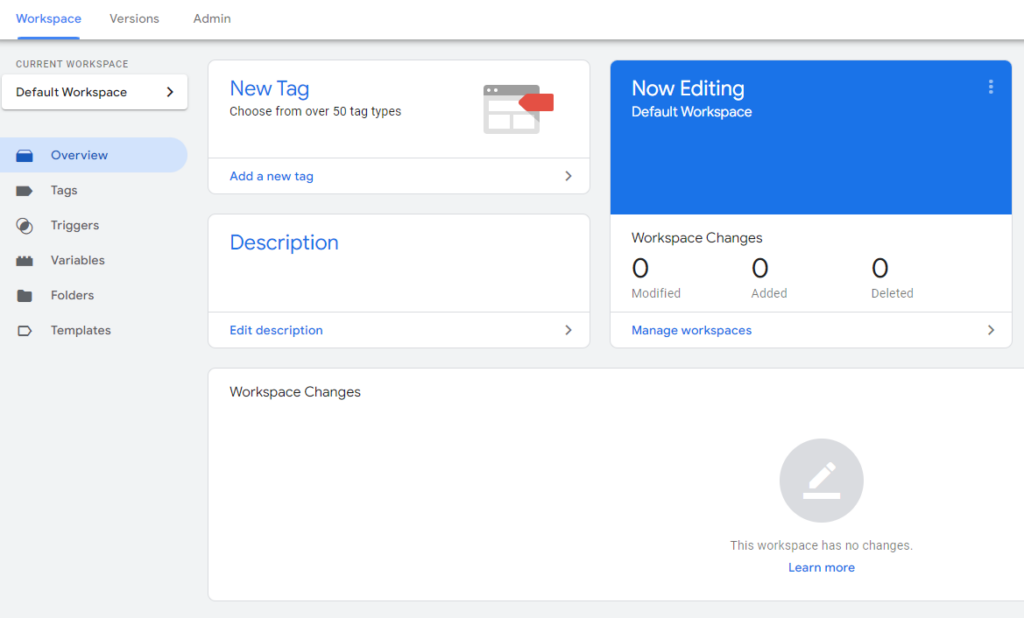
Start by pulling up your GTM dashboard. It should look something like this:
Click “Add a new tag“:

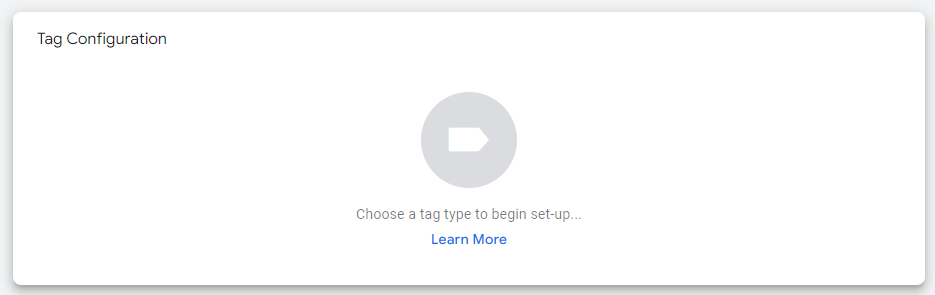
Click “Tag Configuration“:
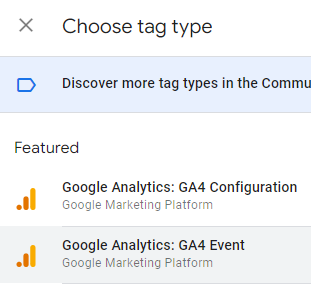
Then “Google Analytics: GA4 Event“:
Select your GA4 configuration tag from the drop down, then name the event:
Best practice tip: Name events using lowercase only and use underscores instead of spaces. Try to be descriptive (like “contact_us_form_submission”).

If you’re tracking email link clicks, name the event appropriately.
Now hit the “Triggering” button:

Instead of choosing a trigger, click the little blue + in the top right:

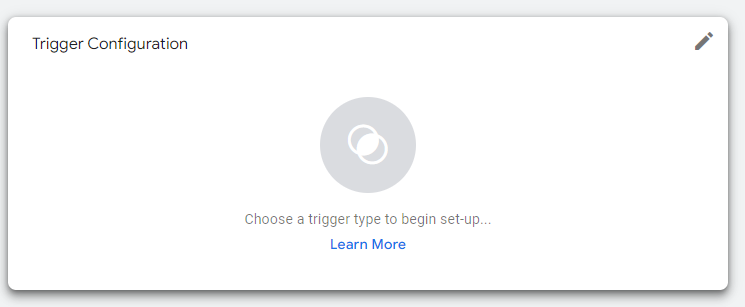
Click “Trigger Configuration“:
Pick “Just Links” from the list:

Ensure “Some Link Clicks” is selected, then pick “Choose Built-In Variable” from the first drop down menu:
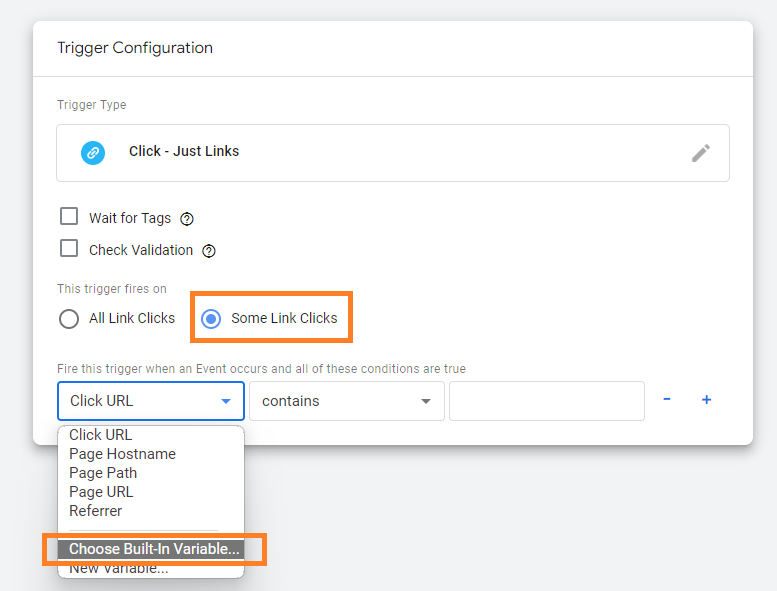
You want to find “Click URL” in the list.
Leave the middle dropdown on “contains“, then type “tel:” in the final box:

If you’re tracking email links, type “mailto:” in the final box instead.
Name the trigger something descriptive. I tend to go for a template of “[event type] – [trigger]“:

Hit the blue “Save” button in the top right.
Name the tag. I tend to go for “[tag type] – [trigger]“. Then hit the “Save” button:
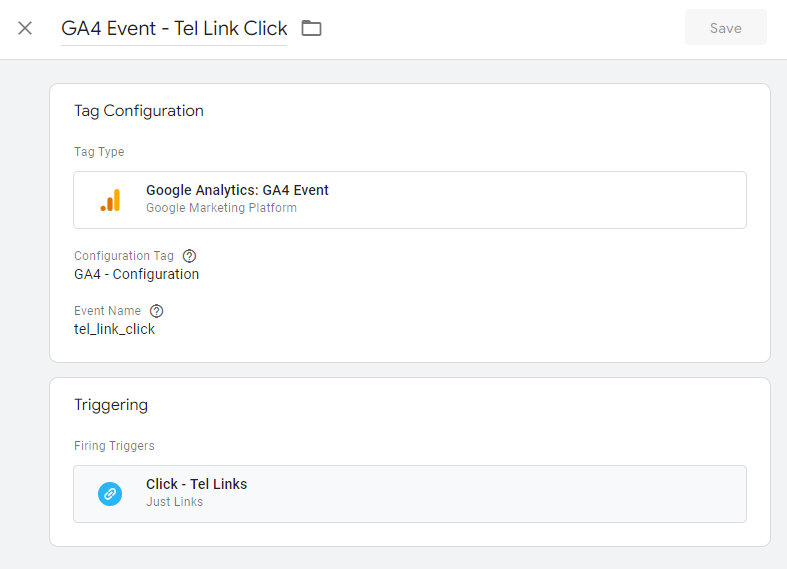
Boom, you just made your first conversion event 👌.

As you can see, tracking link clicks is the same process across both email and phone. Now you know the process, you can track any type of link you want.
The initial part of the process is as the same:
Click “Add a new tag“:
Click “Tag Configuration“:
Then “Google Analytics: GA4 Event“:
Select your GA4 configuration tag from the drop down, then name the event:

Now hit the “Triggering” button:
Instead of choosing a trigger, click the little blue + in the top right:
Click “Trigger Configuration”:
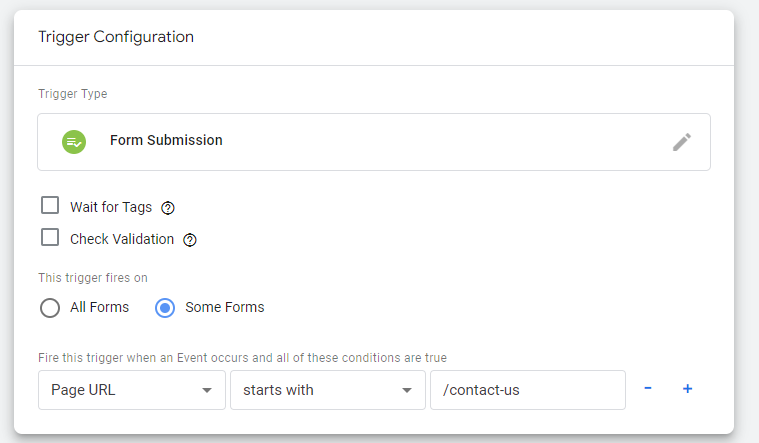
Choose “Form Submission”:
Now you can choose your own adventure. If you just want to track every form submission, leave the settings as they are:

Alternatively, click “Some Forms” to narrow down to forms on specific pages or form IDs.
For example, you could only fire this one when a form on the “/contact-us” page is submitted:
I’m going to leave mine as it is, name the event and hit “Save“:

Now you can name the tag and hit “Save“:
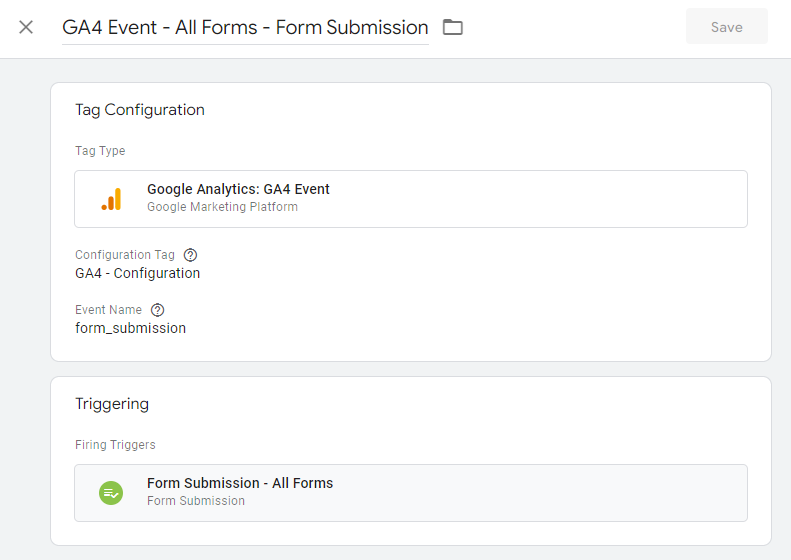
And that’s it! In theory, forms will now send an event to GA4.

You may come up against some hurdles with this, such as the “Form Submit” event not firing for whatever reason. Most often, this is due to GA4 not picking up the JavaScript event.
There are a lot of things that can go wrong with this, but there are a couple of solutions which have worked for me in the past.
The “Thank You” Page
The simplest way to ensure an event always fires with a form submission is to just redirect the user to a “thank you” page.
It’s then just a nice and easy “page view” event. Let me show you.
First, do the usual process from above:
This time, instead of “Form Submission”, choose “Page View”:
Select “Some Pages“, then “Page URL” from the first dropdown. Go with “starts with” for the middle box, then add your thank you page URL slug in the last box:

Quick explainer: We pick “starts with” here instead of “contains” because we want to narrow down the possible matches.
If you have a few pages which start with “/thanks”, you don’t want this to fire on all of them.
However, we don’t want to exact match either, as sometimes users will come in on URLs with query strings, which adds random stuff to the end of the URL, e.g. “/thank-you?utm_source=facebook”.
Name the trigger appropriately (e.g. “Page View – Thank You Page”), then hit “Save“.
Name your tag, and you can save that also.
You’re now tracking form submissions in a roundabout way.

This method isn’t our first choice due to these downsides:
Monitoring for HTML changes
This alternative is a bit more techy, but still relatively easy.
This method is particularly helpful for AJAX forms (the forms which just pop up a little “Thanks for submitting” message under/over the form). Like this:

These forms don’t send you to a “thank you” page, and also don’t necessarily trigger the “form submission” event. This leaves us in a bind, so we have to use a slightly different technique.
You start off the same as usual.
Click “Add a new tag“:
Click “Tag Configuration“:
Then “Google Analytics: GA4 Event“:
Select your GA4 configuration tag from the drop down, then name the event:
Now hit the “Triggering” button:
Instead of choosing a trigger, click the little blue + in the top right:
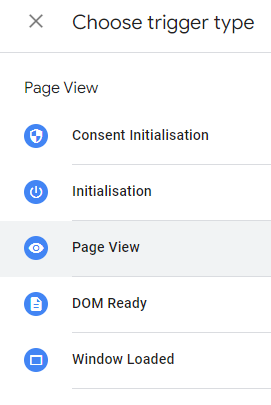
Click “Trigger Configuration”:
This time you’re going to choose “element visibility”:

Now you get presented with quite a few options. Try not to get too sweaty.
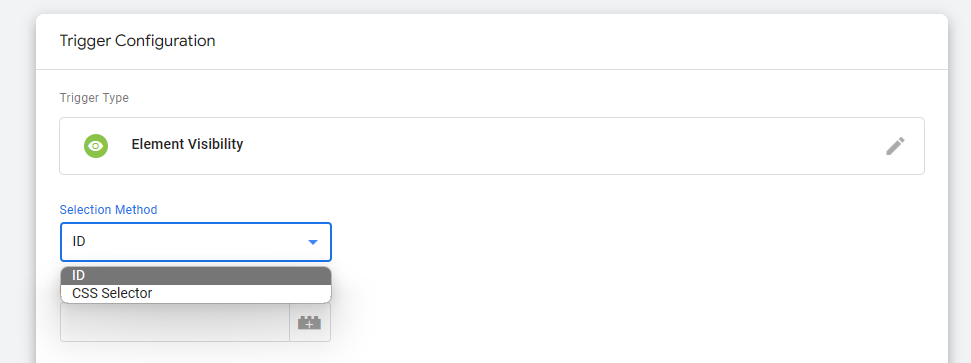
The selection method is really the best place to start, as this will depend on the form you’re tracking.
In a separate tab, open up your website and visit the page with the form you want to track.
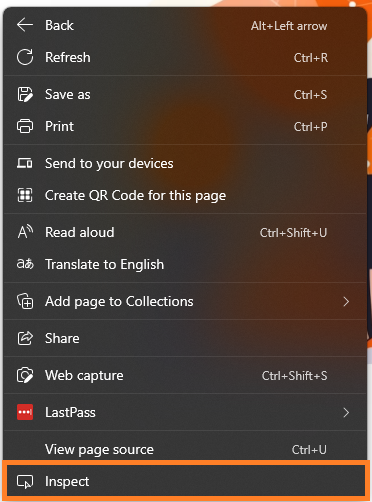
Right click the page (Ctrl+Click on Mac) and click “Inspect“.
This disgustingly complicated window will appear:
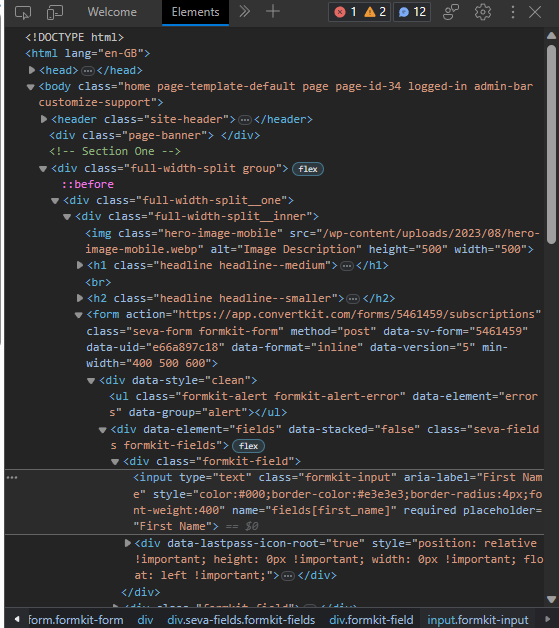
Don’t let it intimidate you. Look for the button in the very top left:

Don’t click it yet! I know it’s tempting.
Instead, fill out your form and submit it so that the “thank you” message appears on your screen.
Now click the button!
You’ll find you can now hover your mouse over elements of the screen:
Hover over the “thank you” box until it is highlighted, then click it.
Over in your inspection window, it will have highlighted the bit of code responsible for that box:
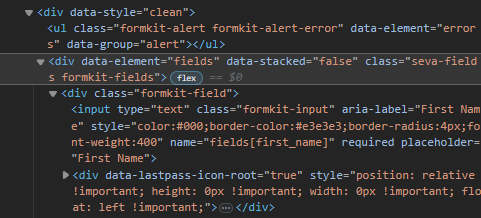
In an ideal world, you would be able to see “id” somewhere in that spaghetti relating to your “thank you” box. Like this:

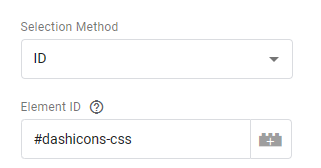
If you have an ID within your “thank you” box code, you can take that as it is and stick it into the box in GTM. IDs have to be prefixed with a hashtag. Like this:
If you instead want to target a “class” element, you would put a full stop (period) in front of the CSS selector. Like this:

Without getting bogged down with CSS, it’s worth knowing that IDs are unique, but classes are reusable. As such, IDs are a reliable way of tracking the visibility of a specific element, but classes can risk duplication. For example, you may find all your forms trigger if they share the same class.
To lower the risk of this, you can set up the rest of your trigger like so:
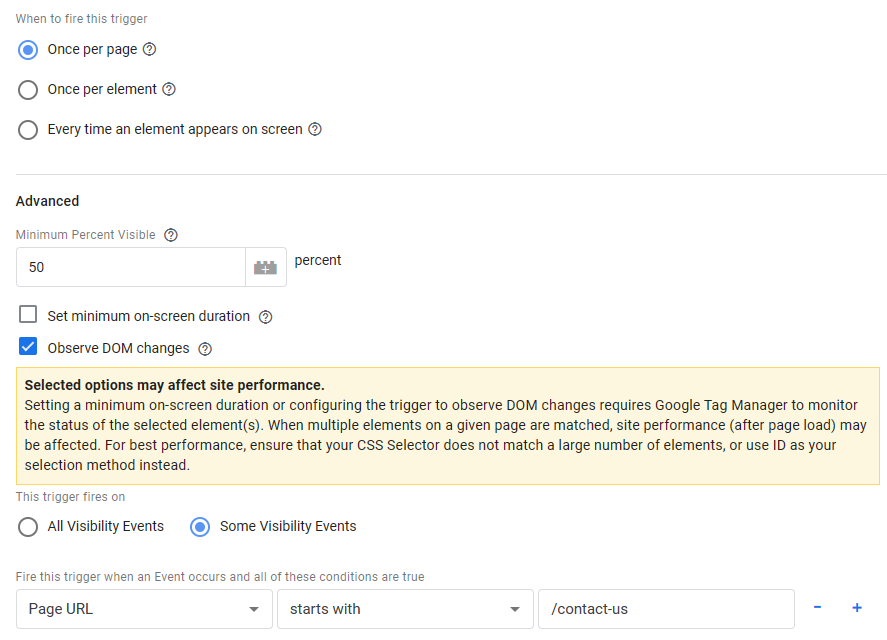
“Once per page” stops the trigger firing again if there is a duplicate class. “Observe DOM changes” means it will pick up when the “thank you” box appears.
Selecting “Some Visibility Events” and putting in the page URL which the form is located will help prevent duplicate forms classes triggering from elsewhere on your site.
As before, name your event wisely, save it, then name and save your tag.

And there we have it, a handful of ways to track lead conversions.
Tracking eCommerce is a whole other ballgame and unlikely to be something I cover on this blog, but if I do, I’ll stick the link in here 😉
For other guides like this, plus lots of other juicy and actionable info, why not subscribe to the Clarity newsletter? Sign up below.
Founder of Latent Clarity and author of the Clarity newsletter.
I help new and solo marketers be the best they can with practical, actionable, (and sometimes funny) advice.